APOD Firearms

Semi-M11/9 Build

The #1 community for Gun Owners of the Gulf Coast States

Member Benefits:

  • Fewer Ads!
  • Discuss all aspects of firearm ownership
  • Discuss anti-gun legislation
  • Buy, sell, and trade in the classified section
  • Chat with Local gun shops, ranges, trainers & other businesses
  • Discover free outdoor shooting areas
  • View up to date on firearm-related events
  • Share photos & video with other members
  • ...and so much more!
  • Trust1984

    Shooter
    Rating - 100%
    1   0   0
    Joined
    Jul 8, 2023
    Messages
    20
    Points
    3
    Location
    Bradenton/Sarasota
    Day 1

    Getting ready to start:

    20230912_154856.jpg


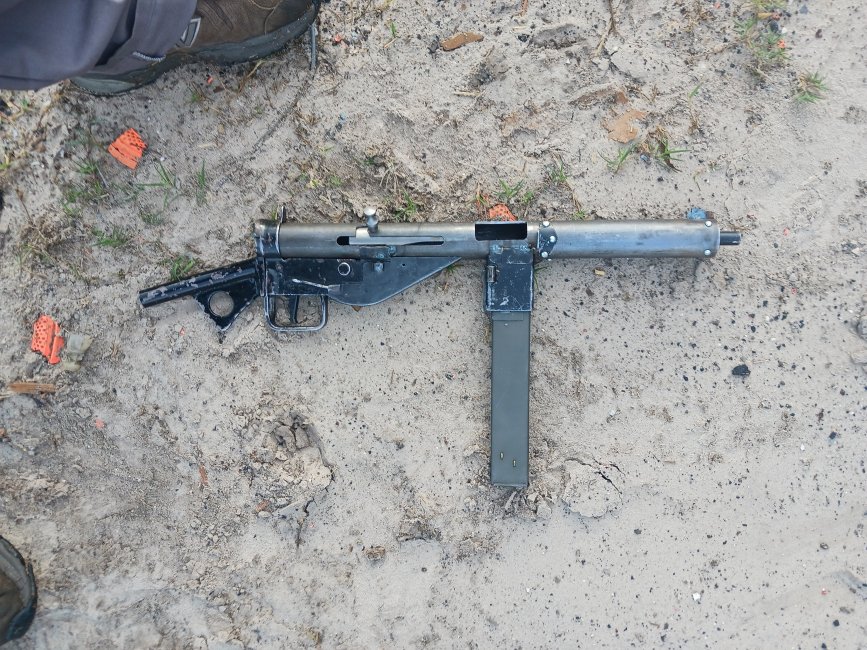
    Threw a couple of short welds on the frame to hold things together.


    20230912_175549.jpg


    Still a good deal more welding and work to do. But everything is fitting together and functioning when hand cycled. Grip isn't welded on yet. I'm going to weld the entire upper, and grind the welds clean before I attach the grip. The plug weld at the front kicked my ass. I was so concerned about the side bowing out, I ended up having them slightly bowed in. So far, not a problem, but I have to make sure I do short welds and let it cool so that it doesn't warp.

    I've seen some sources say that the hammer and trigger pin holes don't need to be hardened. Others say that they need to be. I'm not sure how I would do that if it is necessary.

    Goals:
    Weld on rear sight/frame reinforcement.
    Finish welding frame bottom corners. Then grind the welds clean.
    Weld on trigger and grip.

    I'm not sure if I am going to paint this or do some other finish. Realistically, I'll probably throw this in a drawer and let it rust away. I kinda regret getting the side charging upper. I prefer the look of the classic top charger.

    The top charger did make more sense when this was 3d printed.
    20230910_120141.jpg
     

    olecarver

    Master
    Rating - 0%
    0   0   0
    Joined
    Sep 28, 2012
    Messages
    1,609
    Points
    48
    Location
    west side P,Cola Fla
    NIce looking work so far,,, Would love to see test trial and results. May consider builing one myself, Gota love home projects ya know.... Do you soot at one of our local ranges ? Thanks Tom olecarver
     

    Trust1984

    Shooter
    Rating - 100%
    1   0   0
    Joined
    Jul 8, 2023
    Messages
    20
    Points
    3
    Location
    Bradenton/Sarasota
    I shoot at a range local to me. Might be a ways away from you.

    Day 2

    Got the left side welded up ok. Did about 1/4 inch at a time and let it cool.

    20230913_164500.jpg


    I'm no welder, and I think this is the fourth time I've welded steel, but I'm happy with the result.

    I threw the upper in and put some tacks on the top. Unfortunately the recoil spring bent the back. I had to cut those tacks in the evening. I had hoped to be done with this part of the receiver.

    Also, as I tried to weld the right side more, it bowed in more, enough to cause the internal component ?trigger bar? to bind. I didn't do any more welding on the right side, and in the evening cut the weld and tried to push that side out to where it should have been.

    I did some clean up sanding which really lets you see the mistakes in welding near the front and rear of the receiver.

    20230913_171047.jpg


    I also managed to burn my glove to the right side of the receiver.

    When I tried to push that right side back to where it needed to be, I think it ended up bowing the left side out, and making the area of the weld far more visible.

    I've been working on this about 2 hours a day.
    Goals for the next day's work:

    Finish this section of the frame by welding the right side, welding on the rear sight and the top of the frame. Then grind the welds clean for inspection.

    After that, the following day will be adding the trigger guard and grip/magwell. More difficult welding, but far less welding so it shouldn't be too hard. I hope.
     

    Trust1984

    Shooter
    Rating - 100%
    1   0   0
    Joined
    Jul 8, 2023
    Messages
    20
    Points
    3
    Location
    Bradenton/Sarasota
    Day 3. Welded the rear sight on, finished welding the right side. Doesn't look very good. The slightly bowed in right side makes it extremely hard to put in the trigger components, but they move freely once in place.
     

    Trust1984

    Shooter
    Rating - 100%
    1   0   0
    Joined
    Jul 8, 2023
    Messages
    20
    Points
    3
    Location
    Bradenton/Sarasota
    20230915_201412.jpg


    The last few welds went really poorly. But it is functional now. It passes the function check. Safety wants to rest a little crooked due to the safety retainer spring. I'm not sure I have that in correctly, but it works. Now I need to shoot it.
     

    Trust1984

    Shooter
    Rating - 100%
    1   0   0
    Joined
    Jul 8, 2023
    Messages
    20
    Points
    3
    Location
    Bradenton/Sarasota
    Well, it was running great, until the firing pin broke.

    Shoots a couple inches low at 5 yards. Grouping was terrible. I was shooting about an inch group with a Ruger SP101, then when I switched to this I was doing about a 3 inch group.

    A replacement firing pin would be $20 + S&H. I suppose I could make one on the lathe and mill instead. Eh. I think I'd rather go to working on the next project.
     

    Trust1984

    Shooter
    Rating - 100%
    1   0   0
    Joined
    Jul 8, 2023
    Messages
    20
    Points
    3
    Location
    Bradenton/Sarasota
    Hi Midnight.

    I ended up picking up another firing pin from VMAC. The new one has fillets instead of sharp corners and is likely to survive longer. The gun works fine, but is a major PITA to assemble and disassemble.

    Now I am working on a Sten.
     

    Attachments

    • 20240127_083521.jpg
      20240127_083521.jpg
      3.1 MB · Views: 18
    Top Bottom